Introduction
WebRatio Mobile lets you build iOS apps that you can use for test on your mobile or for submission on the Apple Store. This article guide you through the build process, showing how to create a release build, prepare and submit the Application on the Apple Store.
Prerequisites
The procedure shown in the article requires you to have:
- an active internet connection to build the project
- a mac computer
- all the graphical assets (including icons, images, screenshots and marketing material) to identify and advertise your application. To learn more about icons and images please read the official Apple specification available here (read the paragraphs Icon and Image Design)
- a developer account for the Apple Store.
To register please follow these steps:
- Choose the Developer Program for you here
- Enroll using your Apple ID or create a new one
- Register as a developer
- Read the Developer Distribution Agreement
- Pay the 99$ USD yearly registration fee
- Verify the account
- read, understood and done all of the steps required to get an App ID, an App Certificate an iOS Provisioning Profile. To know more about you can refer to the Managing your Apple Signing Identities article.
Build iOS App
You can easily build an iOS App creating and configuring an iOS build configuration for your mobile project.
You can even create more than one build for the same mobile project according to your needs.
The iOS build process is done in a single step and requires an active Internet connection since its executed on a WebRatio Cloud Server. Moreover due to Apple restriction the user must be registered as a certified developer on iOS Developer Center. To know more details about registering as a certified developer please refer to the Prerequisites section of this article.
The Build option  is available in the main WebRatio Mobile Platform toolbar.
Press this button to open the Build As Configurations dialog.
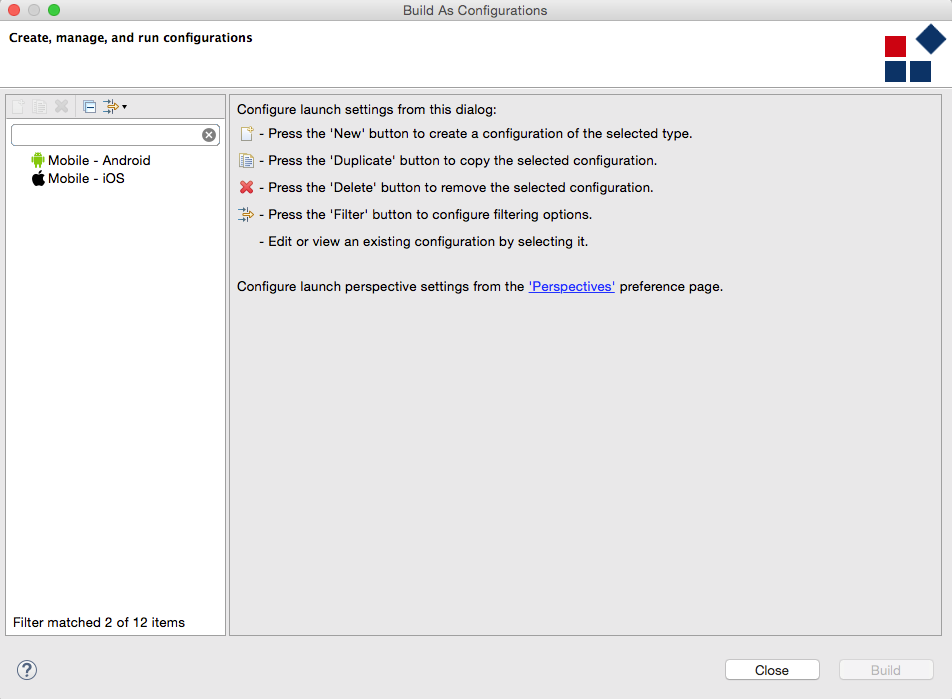
To create a Mobile iOS Build Configuration right click on the Mobile - iOS option and select New.
A dialog called Build As Configuration is shown.
Configure the properties as explained in the next section and press Build to start the build process.
Release Build Mode
Before proceeding please be sure to fulfill all of the required steps reported in the Prerequisites section of this article.
This build mode can be used when you have to prepare the app for submission to the Apple Store or if you want to have a lightweight package to test the application on the device without the debug infrastructure. To know how to test your application on a device refer to the How to Build and Test an iOS Application article.
To create a release build you need to configure the Build As Configuration dialog (build-dialog hereinafter) using almost all of the properties available in the Main tab.
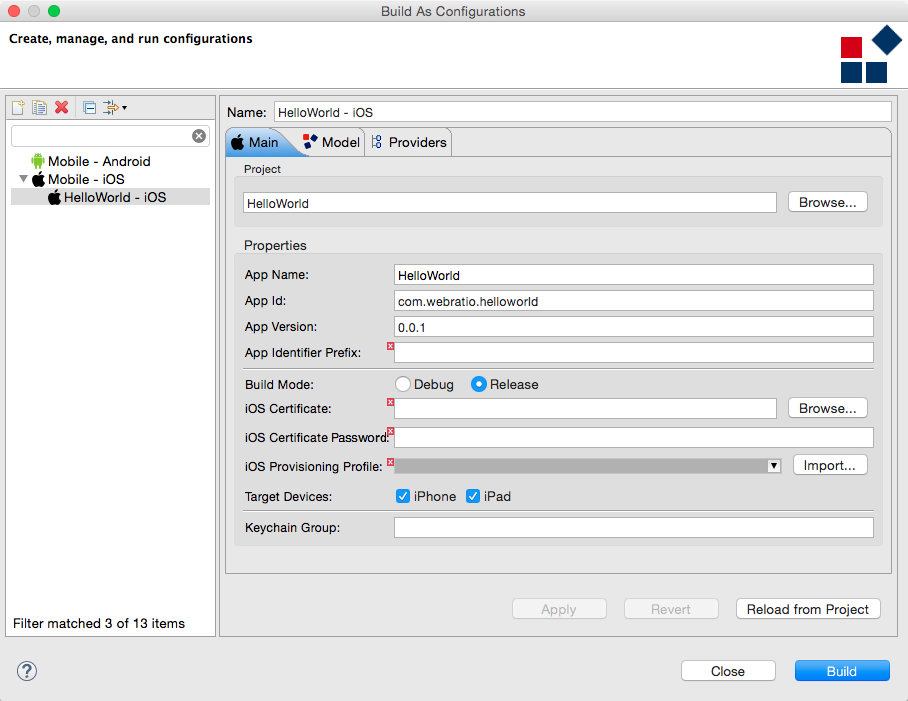
The Main tab of the dialog contains the information needed to correctly create the mobile application package.
The Project property contains the reference to the Mobile Project you want to build; it is preloaded with the current open one, however you can choose another project using the Browse... button.
The three properties App Name, App Id and App Version are respectively the name, the unique identifier and the version of the mobile application. These properties are preloaded by WebRatio Mobile Platform but you are free to change them as needed. All three properties are mandatory in order to build the project successfully.
The App Identifier Prefix, also mandatory, is a 10-character hexadecimal string generated by the iOS Certificates, Identifiers & Profiles page. It is unique to you and your developer account.
Then, to create a debug build set the Build Mode property to Release.
The iOS Certificate property represents your Apple Developer certificate that must be downloaded from the Apple developer portal. Use the Browse... button to provide it for the build process.
The iOS Certificate Password property represents the password used to sign the certificate selected with the previous property.
The iOS Provisioning Profile property refers to a file that must be embedded into the Mobile Project and lists all the UUID of the devices available for testing. Like the Certificate Name it is personal and must be downloaded from the Apple developer portal.
The Target Devices property lets you choose the device you want to build for; you can choose between iPhone and iPad.
The Keychain Group property is used to share the credentials between several mobile application. This property contains a string that represents the Group Identifier of the mobile application you want to share the credentials. This property is not mandatory when you build in debug mode as it strictly depends on the App structure. To know how to get the Group Identifier please refer to this tutorial.

The Model tab contains some project configuration properties that let you customize the behavior of the mobile application. It’s not mandatory to set the properties of this tab, it depends strictly on your mobile app.

The Back-end Base URL is the URL of the remote Back-end server. If your app uses one remember to set a value for it.
The Check Credentials on Resume states whether the user credentials must be checked every time the user opens the mobile application or not. This is another option strictly related to your app structure.
Once all of the properties are set correctly you can press the Build button to start the process.
A dialog will show you a feedback message about the build execution.
Build result
The build process ends successfully and you will see a page showing the App Dashboard.

From this page you can download the *.ipa package from the Download App Package link and then move it to the phone using iTunes.
To learn how to install and run a build on your device, refer to the How to Build and Test an iOS Application article.
Publish iOS App
Before going through the content of this section you have to prepare your iOS App for publishing on the Apple Store. Make sure you accomplish all of the following tasks.
- Prepare the Branding Assets
In order to publish an iOS App you have to prepare a set of assets, called branding assets, that do belong to the *.ipa package.
WebRatio Mobile Platform helps you define the set of Icons and the set of Splash Screens through the Prepare Branding Assets tool.
This tool is available right clicking on a Mobile Project from the WebRatio Explorer and choosing the WebRatio > Prepare Branding Assets option.

You only have to provide one icon file for the Icons and one for the Splash Screens; then the tool automatically resizes the images to fit all of the required size and resolutions and produces, as output, two folders containing the generated icons and splash screens.
- Prepare the Remote Servers
If your app uses external services, make sure they are up and running, and make sure that your app is able to connect to them.
- Build the App in Release Mode
You can refer to the Release Build Mode section of this article.
- Test the Application for Release
There are common tests you have to do before starting the publish process in order to be sure that most common features are working correctly. You can refer to the Apple Official Documentation about App testing
- Open iTunes Connect to create a new App
iTunes connect lets you create new Records for an App in order to prepare, manage and the publish your apps. To learn how to use it please refer to the Apple Official Documentation
- Load the App using XCode or App Loader
Once the App is recorded on your iTunes Connect account it’s time to upload the app binaries. To learn how to do it please refer to the Apple Official Documentation.
All the resources linked from the Apple’s Official Documentation are subject to change at Apple’s discretion.